Wire Wrapped Ring Tutorial

Bingo Ring Tutorial
Szarka Carter, Magpie Gemstones
This is a ring that I have made for decades. It is quick, fun and secure. It takes only a bit of time to learn and after a bit of practice, you can have this mastered. Once you have this down you can get creative and make it uniquely your own. Twist the wires that go over the top of the stone, add beads, create designs with the wire, frame the rock with the wire. Play with this basic structure once you have it securely held and have fun!
Materials
- 18 gauge dead soft wire – approximately 2.5 feet (more for large ring)
- Stone – elongated without a hole – stone selection is important due to the manner in which this ring is made
Tools
- Ring mandrel or dowel the size of the ring you are making
- Chain nose pliers
- Flush cutters
- Small hammer

Steps
1 Measure and flush cut approximately 2.5 feet of 18 gauge wire (longer for large ring).
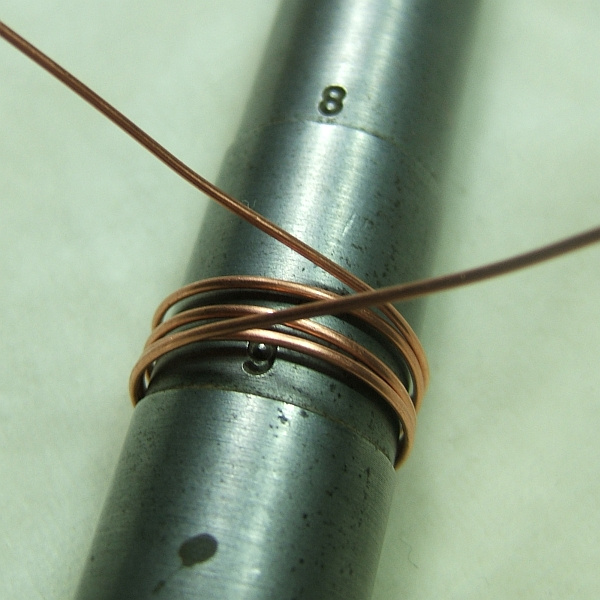
2 Place the center of the wire on the top of the ring mandrel and wrap each end to the back and then around again to the front.
3 Repeat step 2 ending with the wire ends in the front as shown in the picture.

4 Leave the wire on the mandrel and cross the wires in the center of the wraps. To accomplish this, turn the top wire down towards the larger end of the mandrel and the bottom wire up towards the smaller end as shown in the picture.

5 Form a flat circle on the top of the ring band by continuing to wrap the wire ends in a circular fashion around the circle you created as shown below.

6 Wrap the wire around the circle about 3 times. You want this circular wrap to lay flat on the ring band wires. (Don’t lose any sleep over making a perfect circle. This is really for support and doesn’t show.) Gently hammer it flat while still on the mandrel. (Yes, that’s a hammer in the top right of the photo.)

7 Remove the ring from the mandrel.
8 Take one end of the wire and wrap it once around the ring band on the side of the swirl. Start this wrap on the top of the ring band. Use your chain nose pliers to gently press down this wrap down on the ring band.

9 Repeat step 8 with the other wire end.

10 Center the elongated stone on top of the flat wire circle perpendicular to that circle.
11 Wrap one end of the wire around the stone from underneath the stone to the top two times. (Yes, this is tricky, but you can do it!)

12 Repeat step 11 with the other side.

13 Wrap the wire end around the ring band again at least two times. Press this against the ring band with your chain nose pliers.
14 Flush cut off the excess wire.

15 Repeat step 13 & 14 with the other wire.
16 Use your chain nose pliers to gently twist each wire that is on top of the stone taking care not to scratch the stone or mar the wire. This will tighten the wire enough to hold the stone in place.
From here is where you can get creative and make it uniquely your own. Twist the wires that go over the top of the stone, add beads, create designs with the wire. Play with this basic structure once you have it securely held and have fun!
GOOD LUCK!
Helpful Photos


Tutorial by Szarka Carter
Photos by Tera Carter
Written by Karen Meader
I found a video tutorial Denise Mathews created of the same ring.
**Contributing authors are noted. All articles are copyright. You can reprint these articles as long as this website is linked. The name Magpie Gemstones must be used as the hypertext.


