Wire Binding or Wrapping
WIRE BINDING OR WRAPPING
DR KAREN MEADOR
 Sometimes a technique that seems so easy takes some time and effort to perfect. Wrapping, aka binding, has been that way for me. First I didn’t know how to hide the ends of my wire at the beginning and end of the wrap. Then I realized that each wrap around should line up right beside the preceding one. There was also that issue of getting the wire wrapped tightly. I definitely needed help. I hope the following will provide that for you whether you are just learning wire work or honing your skills. As for me, I’m still practicing and the examples below are not perfect.
I’m wrapping with 22 gauge round copper wire around a heavier scrap piece of wire in the pictures of a practice piece that follow. I usually use 24 gauge wire when I’m creating decorative wraps for earrings and bracelets or adding beads to embellish a wire, however this 22 gauge will show up better in the photos. While being frugal with your wire is admirable, 22 gauge copper wire is not expensive so be sure you begin with a piece that is longer than you expect to use. This will allow you to get a better grip on the wrapping wire. For the practice piece below, I cut approximately 6 inches of 22 gauge wire.

NOTE: The photos show my “wire worker’s thumb”. As you can see I sport a broken fingernail and messy polish. Please, just laugh with me.
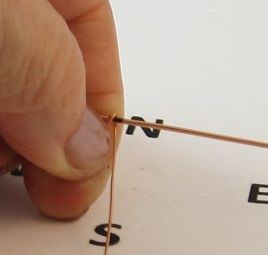
The pictures below show directionality using North, South, East and West. Create a hook in the end of the lighter gauge wire by placing the chainnose pliers about ½ inches from the top of the wire and turning it down.

Place the hook over the wire(s) you are wrapping with the short end facing you. Firmly hold the hook and the wire being wrapped between your thumb and forefinger of your nondominant hand. Using your dominant hand pull the wire straight North at a right angle to the heavier wire. 
When the wire is in the N position, again at a right angle to the heavier wire, pull the wrapping wire straight back down to the S position.
Again, pull the wire N, but be sure that you lay this wrap right beside the first one. If you think about laying this wrap on the very edge of the last one, it will fall right in to place when you give it a tug after it reaches N.
You may want to gently push the wrapping wire against the heavier wire with the chainnose pliers every once in a while to encourage its proper alignment. The frequency required depends partly on the gauge of the wire you are using.
Wrap the wire a bit past the position where you intend to cut the end. Then pull it slightly off the heavier wire and flush cut it. Use the chainnose pliers to squeeze the end against the heavier wire. Finish the beginning of the wrap in a similar manner. The hook and likely the first wrap at the beginning will be crooked. If so, remove these and cut them off.


Earrings


Cut two 7 inch lengths of 18 gauge wire and two 6 inch lengths of 24 gauge wire (or 22).
Measure 2 ¾ inches from one end of one of the 18 gauge wires and mark this place with a permanent marker.

Begin the wrapping at this point according to the technique described in the Wire Wrapping or Binding Tutorial.
When you have about 5 good wraps, begin attaching the beads by threading them on the wire one at a time.

Complete two wraps between each bead and end with another 5 good wraps. Flush cut the ends of the wrapping wire.


Gently wrap the side of the 18 gauge wire opposite the beads around a ring mandrel or other round object.

Push the beads to the inside of the rounded shape.

Cross the 18 gauge wires at the top of the earrings. One side will be longer than the other. Position these such that the shorter wire is 1 ½ inches long past the cross point.
Use the chainnose pliers to turn both wires N away from the beads.

Wrap the shorter wire abound the longer one twice and flush cut it.

Make a wrapped loop with the longer wire and flush cut it.

I like to carefully hammer the part of the earring that does not have beads. But that is a personal choice.
If you want to patina these, this is the time. Just be sure you have used nonporous stones that will not take up the color of the patina. I usually patina with Liver of Sulphur and then the earrings spend a couple of hours in the tumbler.
Now just add ear wires and you’re all set. How are your wraps?
Karen Meador
**Contributing authors are noted and linked to in the articles they wrote. All articles are copyright. You can reprint these articles as long as the original author is sited and a link to their site and this website is included. The name Magpie Gemstones must be used as the hypertext.


